
Treasure Frames lesson now back again

This was one of my favorite lessons of all times to make. I LOVE the distressed and grungy look of the antiqued paper, and the powerful meaning that an embellished frame attaches to a quote.
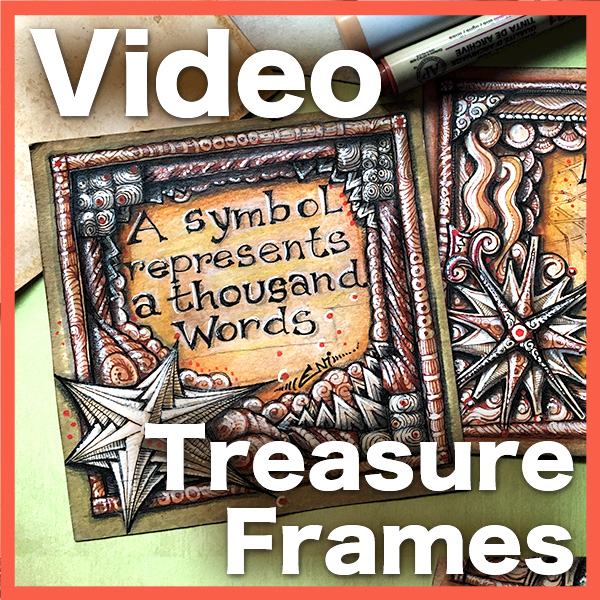
The Renaissance brown/black combo makes everything look more precious, like some important and ancient document that was discovered in a treasure chest.

This lesson is now finally back to the video lesson shop, and it's an hour long video bundled up with a few bonus PDFs such as a recipe card, a video summary and a case study sheet for you to print.
This lesson is almost like a continuation of the previous lesson Tan Treasure. Here's one of the pictures again — I just can't get enough of how wonderful this looks.

The lesson starts by showing you how to create these fantastic antiqued papers using distressed inks. I think that's half the fun right there!

After that, I'll show you how to plan the composition, how to center the quote and transfer it to the paper tile.

That's when the fun REALLY begins, we'll create the decorated frame using brown and black inking pens, and I'll show you exactly how to plan and add a focus element to the frame such as a star or blossom tangle.

It doesn't stop there — the shading and coloring is crucial to make this piece look super precious. We'll shade using markers (or watercolors).

You'll also learn ow to add little embellishments and hatching to the piece, following the shading, to create a rich tapestry of tangles.

And finally, I'll show you how to bring out the highlights using white pencil and white gel pen.

The result is a stunning sparkling and precious piece that you'll want to frame and keep.

You can find this lesson now, back again, at my lesson shop.


This crazily busy image is inspired by project pack 20 using Hollis, Moon Pie, Toobs (Angie Gittles) and Travel (Jodi Genovese). Whew, talk about embellishments. Toobs looks a bit like Zander to me.